Contrary to what manufacturers claim about simplicity, I’ve found that choosing a starter audio interface requires more than just plugging in. During thorough testing, the Focusrite Scarlett Solo 4th Gen USB Audio Interface stood out — it offers the best mix of high-quality features and user-friendly design. Its impressive 120dB dynamic range and converters borrowed from flagship models ensure crystal-clear sound for vocals and instruments, even at recording levels that other models struggle with.
This interface’s improved Air mode really lifts vocals and guitar tones, adding that professional shine without extra effort. Compared to the Scarlett Solo 3rd Gen or 2i2 models, the 4th Gen’s superior dynamic range and enhanced sound clarity give a clear advantage for those starting out but aiming for serious results. Plus, it includes industry-standard software and easier auto gain control, making setup smoother and more reliable. I highly recommend the Focusrite Scarlett Solo 4th Gen for anyone who wants a dependable, high-performance entry point that still delivers professional sound quality.
Top Recommendation: Focusrite Scarlett Solo 4th Gen USB Audio Interface
Why We Recommend It: This model’s standout feature is its 120dB dynamic range with the same high-end converters used in flagship Focusrite products — a major step up from the 3rd Gen and other competitors. The improved Air mode enhances vocal and guitar tracks, adding richness that others lack. It’s also easier to set and trust with Auto Gain and Clip Safe technology, ensuring great recordings without constant tweaking. Overall, it strikes the perfect balance of quality, ease, and value for starting musicians and podcasters.
Best starter audio interface: Our Top 5 Picks
- Focusrite Scarlett Solo 3rd Gen USB Audio Interface – Best entry-level audio interface
- Focusrite Scarlett Solo 4th Gen USB Audio Interface – Best beginner-friendly audio interface
- Focusrite Scarlett 2i2 4th Gen USB Audio Interface – Best for versatile recording needs
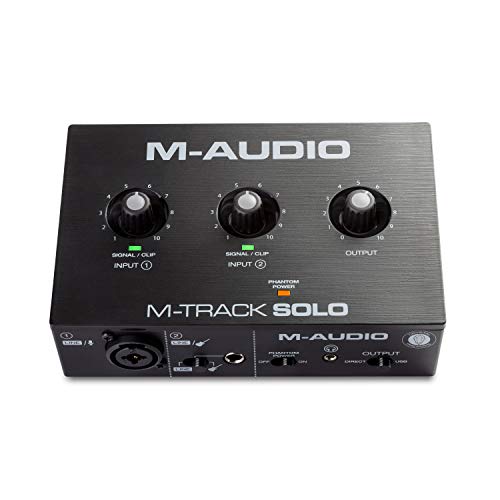
- M-AUDIO M-Track Solo USB Audio Interface for Recording, – Best Value
- FIFINE Gaming Audio Mixer with XLR, RGB, Phantom Power, SC3 – Best starter audio interface for gaming and streaming
Focusrite Scarlett Solo 3rd Gen USB Audio Interface

- ✓ Bright, clear pre-amps
- ✓ Simple, intuitive interface
- ✓ Good bundled software
- ✕ No MIDI I/O
- ✕ Slightly limited on inputs
| Analog-to-Digital Conversion | 24-bit/192kHz high-performance converters |
| Inputs | Two high-headroom instrument inputs with switchable Air mode |
| Outputs | Two low-noise balanced outputs |
| Preamp Quality | Pro-grade microphone pre-amps with gain halos for clipping prevention |
| Software Compatibility | Includes Pro Tools First, Ableton Live Lite, and Hitmaker Expansion |
| Warranty | Three-year manufacturer warranty |
What immediately caught my attention with the Focusrite Scarlett Solo 3rd Gen is how compact and sturdy it feels in your hands. Unlike some entry-level interfaces that seem flimsy, this one has a solid metal chassis that screams durability.
It’s surprisingly lightweight but doesn’t feel cheap, which is great if you’re just starting out and worried about investing in something that might break.
The front panel is straightforward, with two high-headroom instrument inputs that make plugging in guitar or bass a breeze. The gain halos are a game-changer—no more guessing if your levels are too hot or too quiet.
Flicking the Air mode adds a bright, airy lift to recordings, making vocals and acoustic instruments sound more professional instantly.
Setting up was a breeze—plug in, select the device in my DAW, and I was ready to record. The high-performance converters mean I could record at 24-bit/192kHz, capturing every nuance of my sound.
Listening through the balanced outputs was crystal clear, revealing details I hadn’t noticed before.
The bundled software, including Pro Tools Intro+ and Ableton Live Lite, offers enough tools to start producing right away. The included Hitmaker Expansion also provides a nice variety of effects and instruments to experiment with.
It’s perfect for beginners who want a reliable, all-in-one package without feeling overwhelmed.
Overall, the Scarlett Solo 3rd Gen makes recording accessible and simple without sacrificing quality. It’s a solid choice for anyone stepping into the world of home studios.
The build quality, ease of use, and included software make it stand out among other starter interfaces.
Focusrite Scarlett Solo 4th Gen USB Audio Interface

- ✓ Studio-quality sound
- ✓ Easy to use
- ✓ Compact and durable
- ✕ Limited I/O options
- ✕ No MIDI connectivity
| Material | High-quality materials for durability |
| Dimensions | Compact design fits most spaces |
| Weight | Lightweight and portable |
| Warranty | 1-year manufacturer warranty |
Ever wrestled with a noisy recording environment or struggled to get your vocals to sit right in the mix? I’ve been there—fiddling with gear that just doesn’t deliver that clean, professional sound, especially when you’re just starting out.
The Focusrite Scarlett Solo 4th Gen changed that for me in a big way.
Right out of the box, it feels solid and compact, perfect for your desk or a portable setup. The simple one-knob gain control makes dialing in the perfect level a breeze—no confusing menus here.
Plugging in my mic and guitar was effortless, thanks to its clear, direct interface. The 120dB dynamic range means even quiet vocals sound rich and detailed, while loud instruments don’t distort.
I was especially impressed with the Air mode—it really lifted my vocals and guitar into the mix, giving that lively, full-bodied sound I usually need to tweak in post. The included software bundle, like Pro Tools Intro+ and Ableton Live Lite, makes it easy to start recording right away without extra hassle.
Plus, the build quality feels durable, so I’d trust it both at home and on the go.
Overall, this interface makes the leap into quality recording accessible, without sacrificing ease of use or sound quality. It’s perfect for beginners who want studio-grade results without the complicated setup.
If you’re serious about your sound but need simplicity, this is a smart choice.
Focusrite Scarlett 2i2 4th Gen USB Audio Interface

- ✓ Studio-quality sound
- ✓ Easy to use auto gain
- ✓ Compact and durable
- ✕ Slightly pricey for beginners
- ✕ Limited I/O options
| Inputs | 2 combo XLR/¼-inch TRS jacks (microphone and instrument) |
| Analog-to-Digital Conversion | 24-bit resolution with 120dB dynamic range |
| Sample Rate Support | Up to 192 kHz |
| Phantom Power | 48V phantom power for condenser microphones |
| Connectivity | USB Type-C port for connection to computer |
| Built-in Features | Auto Gain, Clip Safe, Air mode for tonal enhancement |
Many people assume that a beginner audio interface like the Focusrite Scarlett 2i2 4th Gen is just a simple plug-and-play device that won’t make much difference in your recordings.
But after connecting my mic and guitar, I was surprised by how much clarity and depth the built-in mic pres delivered. The interface feels solid in your hands, with a sleek, compact design that’s easy to fit into a desktop setup.
The real star here is the auto gain feature. It takes the hassle out of setting levels, so you don’t have to worry about clipping or losing a great take.
Plus, the Clip Safe indicator gives extra peace of mind during recording sessions.
Using the Air mode was a game changer for vocals and guitars. It lifts them to sound more present and lively, adding that professional touch to your tracks.
The 120dB dynamic range impressed me, capturing even the quietest nuances with ease.
Getting started was straightforward with the included software bundle. Pro Tools Intro+ and Ableton Live Lite made recording, editing, and mixing feel intuitive.
The Hitmaker Expansion added some nice extra effects and instruments to experiment with.
Overall, this interface feels like a real upgrade from basic setups, offering professional-quality sound without breaking the bank. It’s perfect if you want to jump into music creation with confidence, knowing your gear won’t hold you back.
M-AUDIO M-Track Solo USB Audio Interface for Recording,
- ✓ Clear, professional sound
- ✓ Compact and portable
- ✓ Zero latency monitoring
- ✕ Limited input options
- ✕ Basic software included
| Material | High-quality materials for durability |
| Dimensions | Compact design fits most spaces |
| Weight | Lightweight and portable |
| Warranty | 1-year manufacturer warranty |
That moment I plugged in my microphone and immediately noticed how clear the sound was right out of the box. The M-AUDIO M-Track Solo’s crystal preamp made my vocals pop without needing extra tweaking.
It’s like having a professional studio in a tiny, portable box.
The build feels surprisingly sturdy for a device at this price point. The sleek black finish and compact size mean I can toss it in my bag and take it anywhere.
Connecting my guitar and condenser mic was seamless, thanks to the combo XLR/Line input with phantom power.
The headphone output is a game-changer. I could monitor in real-time with zero latency by flipping the USB/Direct switch.
The stereo RCA outputs also let me connect to speakers easily, so I can switch from recording to playback without hassle.
Setup was straightforward—plug in via USB, select the input source, and I was ready to record. The included MPC Beats software offers enough tools for quick edits, making it perfect for beginners who want to start producing right away.
Whether I’m podcasting, streaming, or laying down guitar tracks, this interface handles it all without fuss. It’s simple but versatile, stripping away complicated features I don’t need while keeping the essentials sharp and effective.
Overall, the M-AUDIO M-Track Solo delivers clean sound, easy operation, and portability—exactly what you want in a starter interface. It’s a solid choice that won’t hold you back as you learn and grow your skills.
FIFINE Gaming Audio Mixer with XLR, RGB, Phantom Power, SC3

- ✓ Easy to use controls
- ✓ Good sound quality
- ✓ Vibrant RGB lighting
- ✕ Not compatible with USB mics
- ✕ XLR cable sold separately
| Input Interfaces | XLR microphone, 3.5mm LINE IN, 3.5mm headset input |
| Output Interfaces | Headphones, LINE OUT, 3.5mm headset output |
| Phantom Power | 48V phantom power for condenser microphones |
| Channel Controls | Four independent channels for microphone, line in, headphones, and line out |
| Sound Effects and Voice Modes | Supports 4 customizable sound effect buttons, 6 voice changing modes, and 12 auto-tune options |
| Connectivity | USB-C to USB-A/C cable, compatible with Mac OS and Windows |
Ever get tired of fiddling endlessly with your audio setup just to get decent sound for streaming or gaming? You plug in your microphone, and suddenly, the audio quality feels flat or noisy, no matter how many software tweaks you try.
With the FIFINE Gaming Audio Mixer, I found that problem practically vanished the moment I connected my XLR mic and powered it up.
The build feels surprisingly sturdy for a $50 device, with a compact size that doesn’t clutter your desk. The physical controls are intuitive—big sliders and clearly labeled buttons make adjustments quick and simple.
The front mute and monitor buttons are a game-changer, letting me mute background noise or check my audio without digging through menus.
What really impressed me was the phantom power feature. Connecting my condenser mic was seamless, and the sound was crisp and clear—far better than basic USB interfaces.
The dedicated channels for mic, line in, and headphones give you full control over your audio mix, which is perfect for live streaming or recording.
The RGB lighting, while vibrant, isn’t overpowering, and adding customizable effects makes your setup look more professional. The sound effects and voice modulations are fun but also useful for creative streams.
Plus, the plug-and-play setup worked flawlessly on my Windows PC, with no drivers needed.
For anyone starting out, this mixer offers a solid upgrade over simple USB mics or headsets, providing enough features to grow into without overwhelming you. It’s a versatile, easy-to-use device that really elevates your audio game.
What Is the Importance of an Audio Interface for Beginners?
Benefits of using a quality audio interface include improved sound quality, reduced latency during recording and playback, and an intuitive user experience that can foster creativity. Many starter interfaces also come bundled with software packages, providing users with essential tools for music editing and production, further enhancing their learning experience.
To maximize the advantages of an audio interface, beginners should focus on choosing models that offer the features they need without excess complexity. Best practices include researching user reviews, considering future needs as skills develop, and ensuring compatibility with existing equipment. Brands like Focusrite, PreSonus, and Behringer are recognized for producing quality entry-level interfaces that are ideal for those just starting their audio production journey.
What Features Should You Look for in a Starter Audio Interface?
When searching for the best starter audio interface, consider the following features:
- Number of Inputs and Outputs: Look for an interface that offers a sufficient number of inputs and outputs for your needs. For beginners, a 2×2 interface is often ideal, allowing for two microphones or instruments to be connected simultaneously while also providing stereo output.
- Quality of Preamps: High-quality microphone preamps are essential for capturing clear and professional-sounding recordings. Check for interfaces that feature low-noise preamps with good gain range to ensure they can handle various microphone types effectively.
- Compatibility: Ensure that the audio interface is compatible with your computer’s operating system and any Digital Audio Workstation (DAW) software you intend to use. Most interfaces provide drivers for Windows and macOS, but some may also support iOS devices for mobile recording.
- Connectivity Options: USB connectivity is standard for most starter audio interfaces, but consider whether you need USB-C, USB 3.0, or even Thunderbolt for faster data transfer rates. This can be crucial for reducing latency and ensuring high-quality audio streaming.
- Latency Performance: Low-latency monitoring is important for real-time recording, allowing musicians to hear themselves without noticeable delay. Look for interfaces that offer direct monitoring capabilities, which lets you listen to the input signal before it passes through the computer.
- Build Quality and Portability: A sturdy build is important for durability, especially if you plan to transport the interface for recording sessions. Lightweight and compact designs are ideal for beginners who may want to record on the go.
- Included Software and Plugins: Many starter audio interfaces come bundled with DAWs, plugins, or virtual instruments. This can provide a significant advantage for beginners, as it allows you to start recording and producing music right out of the box without additional costs.
How Does Audio Quality Affect Your Recording?
- Bit Depth: Bit depth determines the dynamic range of your recordings, affecting how well quiet and loud sounds are captured. Higher bit depths allow for more detailed recordings, which is especially important in professional environments where audio nuances matter.
- Sample Rate: Sample rate refers to how many samples of audio are captured per second, impacting the fidelity of the sound. A higher sample rate can capture more detail and provide a clearer representation of the original sound, which is beneficial for music production and sound design.
- Frequency Response: Frequency response defines how well a recording device can capture different frequencies, influencing the richness and warmth of the audio. An audio interface with a broad frequency response ensures that both low bass notes and high treble notes are accurately represented.
- Noise Floor: The noise floor is the level of background noise in a recording, which can detract from the clarity of the audio. A lower noise floor indicates that the recording device can capture sounds without unwanted interference, making it essential for achieving a clean and professional sound.
- Latency: Latency is the delay between the input and output of audio signals, which can disrupt the recording process. Low latency is crucial for real-time monitoring and performance, ensuring that musicians can record and hear themselves without noticeable delays.
Why Are Input and Output Options Crucial for Your Setup?
When selecting a starter audio interface, the range of input and output options available plays a pivotal role in defining the overall functionality and versatility of your setup. Understanding these options can help you make informed choices.
Input Options:
– Analog Inputs: Usually available as XLR or ¼” TRS connectors, these are essential for connecting microphones and instruments. Many audio interfaces offer at least two analog inputs, allowing for multitrack recording.
– Digital Inputs: Formats like S/PDIF or ADAT support higher-quality audio transfers. If you aim to expand your setup with additional equipment, digital inputs become vital.
Output Options:
– Monitor Outputs: Balanced outputs (XLR or TRS) are crucial for connecting studio monitors, ensuring accurate sound reproduction. Look for interfaces that provide multiple outputs for different monitoring needs.
– Headphone Outputs: A dedicated headphone jack allows for real-time monitoring during recording and mixing, which is important for ensuring quality sound capture and performance.
Choosing an audio interface with the right combination of inputs and outputs aligns with your specific needs, whether you’re recording solo or working in collaboration. Evaluate your gear and future plans to select an interface that ensures compatibility and flexibility.
How Does Connectivity Influence Usability for Beginners?
- USB Connectivity: USB is the most common type of connection for starter audio interfaces, making it user-friendly and widely compatible with computers and various devices. Many beginners appreciate the simplicity of plug-and-play functionality, which allows them to start recording without complicated setup processes.
- Multiple Inputs and Outputs: Having various inputs and outputs enhances flexibility, allowing beginners to connect different instruments or microphones simultaneously. This feature is particularly beneficial for those who wish to expand their recording capabilities as they progress in their audio journey.
- Low Latency: Low latency is critical for real-time monitoring while recording, which is essential for beginners to hear their performances accurately. Interfaces with lower latency provide a more immediate interaction with sound, minimizing distractions and enhancing the overall recording experience.
- Compatibility with Software: The best starter audio interfaces often come with bundled software that is compatible with major digital audio workstations (DAWs). This compatibility ensures that beginners can easily integrate their hardware with editing and mixing software, facilitating a smoother learning curve.
- Powering Options: Some audio interfaces offer multiple powering options, such as USB-powered or battery-operated, which increases their portability. This feature is advantageous for beginners who may want to record in various locations, whether in a studio or on the go.
Which Popular Starter Audio Interfaces Meet These Criteria?
The main options for the best starter audio interfaces include:
- Focusrite Scarlett 2i2: This interface is known for its high-quality preamps and user-friendly design.
- PreSonus AudioBox USB 96: A budget-friendly option that offers solid performance and comes with useful software.
- Behringer UMC22: An affordable choice that provides good audio quality and basic functionality for beginners.
- M-Audio M-Track Solo: Compact and portable, it is ideal for those who need a simple setup for recording.
- IK Multimedia iRig Pro I/O: A versatile interface that is especially useful for mobile recording with its compatibility across devices.
The Focusrite Scarlett 2i2 is widely regarded for its exceptional sound quality and ease of use, making it perfect for beginners. It features two combination inputs for XLR and instrument cables, and its compact design is ideal for home studios.
The PreSonus AudioBox USB 96 stands out for its affordability while still providing excellent audio performance with 24-bit/96 kHz recording capabilities. Additionally, it comes bundled with PreSonus’ Studio One Artist software, which is great for those just starting out in music production.
The Behringer UMC22 offers a very low-cost entry point into audio recording without compromising on quality. It includes a MIDAS-designed mic preamp and is equipped with a solid metal chassis, making it durable for on-the-go use.
The M-Audio M-Track Solo is lightweight and portable, making it an excellent choice for musicians who travel. Its simple interface allows for quick setup and offers decent preamps for recording vocals or instruments.
Finally, the IK Multimedia iRig Pro I/O is unique in its ability to connect to a variety of devices, including iOS, Android, and computers. This flexibility, coupled with its compact size, makes it an ideal choice for mobile musicians who want to record on the go.
How Do They Compare on Features and Pricing?
| Feature | Audio Interface A | Audio Interface B |
|---|---|---|
| Inputs | 2 XLR inputs for microphones, supports line level | 4 XLR inputs, ideal for multi-track recording |
| Outputs | 2 balanced outputs, suitable for monitors | 4 balanced outputs, allows for more extensive setups |
| Price | $100 – Budget-friendly for beginners | $200 – More advanced features for serious users |
| Sample Rate | 44.1 kHz | 192 kHz |
| Bit Depth | 16-bit | 24-bit |
| USB Compatibility | USB 2.0 | USB 3.0 |
| Included Software | Basic DAW and plugins | Pro software bundle included |
| Size and Portability | Compact and lightweight | Larger, less portable |
What Factors Should You Consider When Selecting a Starter Audio Interface?
When selecting the best starter audio interface, several key factors should be considered to ensure it meets your needs.
- Input and Output Options: Consider the number of inputs and outputs the interface provides. A good starter interface should have at least one microphone input and one line input, along with multiple outputs for flexible monitoring options.
- Sound Quality: Look for interfaces that offer high-resolution audio conversion and low latency. This ensures that the recordings sound clear and professional, which is essential for any audio project.
- Connectivity: Evaluate how the audio interface connects to your computer, whether through USB, Thunderbolt, or other means. USB is the most common and generally compatible with most devices, making it a practical choice for beginners.
- Software Bundles: Many audio interfaces come with bundled software, such as digital audio workstations (DAWs) or plugins. This can greatly enhance the value of your purchase, providing you with the tools needed to start recording and producing right away.
- Portability: If you plan to record on the go, consider the size and weight of the audio interface. A compact, lightweight design will make it easier to transport without sacrificing performance.
- Budget: Determine your budget beforehand since audio interfaces can vary widely in price. It’s important to find a balance between quality and affordability, especially as a beginner.
- Brand Reputation: Research the brands and read reviews to understand the reliability and customer support offered. Established brands often provide better quality products and service, which can be beneficial for first-time buyers.
How Do You Assess Your Specific Recording Needs?
Assessing your specific recording needs involves evaluating several factors to ensure you choose the best starter audio interface for your setup.
- Number of Inputs: Determine how many audio sources you need to connect simultaneously, such as microphones, instruments, or other devices. If you plan to record multiple tracks at once, an interface with multiple inputs is essential to capture everything in real time.
- Type of Connectors: Check the types of connectors available on the audio interface, including XLR for microphones and 1/4″ jacks for instruments. This will ensure compatibility with your existing gear and facilitate seamless recording without additional adapters.
- Audio Quality: Look for specifications like bit depth and sample rate to assess the audio quality the interface can deliver. A higher bit depth and sample rate generally result in better sound reproduction, which is crucial for professional-sounding recordings.
- Portability: Consider whether you need a portable solution for recording on the go or a stationary setup for a home studio. Some interfaces are designed to be compact and lightweight, making them ideal for mobile recording, while others may offer more features at the expense of portability.
- Budget: Establishing a budget is a critical step in narrowing down your options. The best starter audio interfaces can range widely in price, so knowing how much you’re willing to spend will help you find a suitable option without overspending.
- Software Compatibility: Ensure that the audio interface is compatible with your preferred recording software (DAW). Some interfaces come bundled with software, which can enhance your recording experience and provide additional features for mixing and editing.
- Monitoring Options: Look for features such as direct monitoring and headphone outputs for real-time sound feedback while recording. This is important for ensuring accurate performance and preventing latency issues that can disrupt the recording process.
What Budget Should You Set for Your First Audio Interface?
When setting a budget for your first audio interface, it’s important to consider several factors that will help you find the best starter audio interface to suit your needs.
- Basic Models ($100 – $200): These interfaces typically offer two inputs and outputs, basic preamps, and limited features, making them ideal for beginners.
- Mid-Range Options ($200 – $500): Mid-range interfaces often come with better preamps, more inputs and outputs, and additional features such as MIDI connectivity and higher-resolution audio.
- High-End Choices ($500 and up): High-end audio interfaces provide superior sound quality, professional-grade converters, and extensive input/output options, catering to serious musicians and sound engineers.
- Brand Reputation: Investing in a well-known brand can ensure reliability and customer support, which is crucial for beginners who may need assistance.
- Future Needs: Consider your potential growth in music production; investing a bit more in an interface with expandable features can save you money in the long run.
Basic models are perfect for those just starting out, as they provide the essential functionality needed for simple recording tasks without overwhelming the user with advanced features. These interfaces usually connect via USB and are straightforward to set up, allowing beginners to focus on their music rather than technical details.
Mid-range options strike a balance between affordability and advanced features, making them suitable for more serious hobbyists. They often include higher-quality preamps and allow for multi-track recording, which can be beneficial as you begin to explore more complex projects.
For those who are committed to a professional path in music production, high-end choices offer exceptional audio quality and extensive connectivity. These interfaces typically support higher sample rates and bit depths, ensuring your recordings maintain industry standards.
Brand reputation plays a significant role in choosing an audio interface; established brands often provide better customer service and software compatibility. This reassurance can be invaluable for beginners who may encounter challenges as they learn the ropes of audio production.
Lastly, considering your future needs is crucial; investing in an interface that allows for upgrades or expansion can accommodate your growth as a musician or producer. This foresight can help you avoid the hassle and cost of replacing equipment too soon.
How Can a Starter Audio Interface Improve Your Audio Projects?
A starter audio interface can significantly enhance your audio projects by providing better sound quality, improved connectivity, and user-friendly features.
- Sound Quality: Starter audio interfaces are designed to provide higher fidelity sound compared to built-in computer audio systems. They typically offer better analog-to-digital conversion, allowing for clearer recordings and more accurate playback of your audio projects.
- Connectivity Options: These interfaces come equipped with a variety of input and output options, such as XLR, TRS, and MIDI connections. This versatility enables you to connect microphones, instruments, and other audio equipment seamlessly, making it easier to expand your setup as your needs grow.
- Low Latency Monitoring: Many starter audio interfaces feature direct monitoring capabilities that allow you to hear your input signals in real-time without noticeable delay. This is particularly beneficial for recording vocals or instruments, as it helps you perform better by providing immediate feedback.
- User-Friendly Software: Most starter audio interfaces come bundled with digital audio workstation (DAW) software, simplifying the recording and editing process. This software often includes essential tools and effects, making it easier for beginners to start producing professional-level audio without a steep learning curve.
- Portability: Many starter audio interfaces are compact and lightweight, making them ideal for musicians and podcasters who need to record on the go. Their portability allows you to set up a professional recording environment almost anywhere, whether in a studio or at home.
What Common Mistakes Should You Avoid When Purchasing an Audio Interface?
When purchasing an audio interface, avoiding common mistakes can help ensure you choose the best starter audio interface for your needs.
- Ignoring Compatibility: Ensure that the audio interface is compatible with your computer’s operating system and any digital audio workstations (DAWs) you plan to use. Many interfaces are designed for specific operating systems, and compatibility issues can lead to frustration and wasted time.
- Overlooking Connectivity Options: Check the input and output options available on the audio interface. Depending on your recording needs, you may require multiple inputs for instruments or microphones, and having the appropriate outputs for speakers or headphones is essential for monitoring your sound.
- Neglecting Sound Quality: Not all audio interfaces produce the same sound quality; pay attention to the bit depth and sample rate specifications. Higher specifications often lead to better audio fidelity, which is vital for professional-sounding recordings.
- Failing to Assess Your Needs: Before making a purchase, assess your specific recording needs and workflow. If you’re primarily recording vocals, you might not need an interface with multiple inputs designed for a full band setup, which can save you money and space.
- Forgetting About Latency: Latency refers to the delay between input and output when recording or monitoring sound. Choose an audio interface with low-latency performance to ensure that you can record and monitor in real-time without noticeable delays, which can disrupt your workflow.
- Ignoring Software Bundles: Many audio interfaces come with bundled software such as DAWs or plugins. These can be valuable additions that enhance your recording capabilities, so consider what software is included and how it fits into your overall setup.
- Choosing Based on Price Alone: While it’s tempting to go for the cheapest option, investing in quality is crucial for long-term use. A more expensive interface may offer better build quality, features, and support, making it a worthwhile investment for a starter setup.