The landscape for microgreen growing kits changed dramatically when hydroponic and soil options came into the picture. I’ve tested several, and the ZESTIGREENS Organic Self-Watering Microgreens Kit really stood out for its versatility. It’s simple—no soil, no mess, just add water—and the grown microgreens burst with crunch and nutrients in just over a week. The hydroponic system works beautifully, especially for quick microgreens, but the option to switch to soil for larger seed varieties like sunflower or cilantro makes it a flexible favorite.
What makes this setup special is the thoughtful design: reusable trays, a detailed grow guide, and the ability to grow both hydroponic and soil-based microgreens. Plus, it’s perfect for kitchen counters, quick harvests, and tends to germinate reliably thanks to the quality seeds. If you want an easy, nutrient-packed gardening experience with options for customization, I highly recommend the ZESTIGREENS Organic Self-Watering Microgreens Kit. It’s a smart choice for both beginners and seasoned green thumbs!
Top Recommendation: ZESTIGREENS Organic Self-Watering Microgreens Kit
Why We Recommend It: This kit excels because it combines hydroponic and traditional soil growing options, giving maximum flexibility. Its self-watering system and included seed variety pack ensure a quick, mess-free harvest—supporting nutrient-rich greens in 7–10 days. The reusable tray and detailed guide make it ideal for busy kitchens and new growers alike.
Best microgreen starter kit: Our Top 5 Picks
- ZESTIGREENS Organic Self-Watering Microgreens Kit – Best for Beginners
- Back to the Roots Microgreen Grow Kit 6-Variety Pack – Best for Home Use
- MetryGrow 48W Full Spectrum LED Grow Light Seed Starter Kit – Best for Growing Indoors
- mizuna Microgreens Growing Kit – 2 Stackable White Ceramic – Best for Small Spaces
- GARDENS ALIVE! Seed Sprouter Kit, Two Tier Stackable – Best Microgreen Starter Kit UK
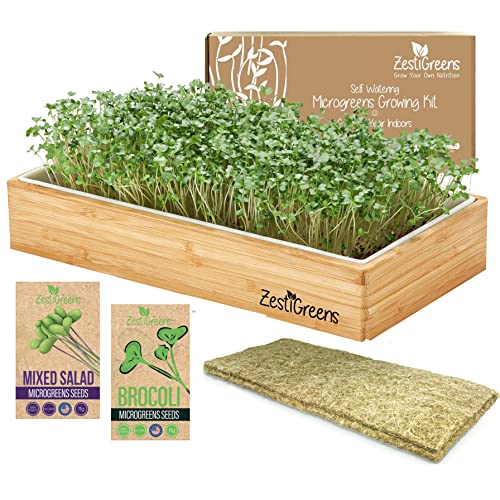
ZESTIGREENS Organic Self-Watering Microgreens Kit
- ✓ Easy to use
- ✓ No soil mess
- ✓ Fast sprouting
- ✕ Small yield
- ✕ Limited to certain microgreens
| Tray Dimensions | 12 inches x 6 inches |
| Grow Mat Type | Hemp fiber |
| Growing Time | 7 to 10 days |
| Seed Varieties Included | Red Garnet Amaranth, Superfood Mix (Broccoli, Kale, Kohlrabi, Arugula, Cabbage) |
| Grow Method Flexibility | Hydroponic or soil-based cultivation |
| Lighting Requirement | No special lights needed |
Unboxing the ZESTIGREENS Organic Self-Watering Microgreens Kit feels like discovering a tiny, sleek garden on your countertop. The reusable 12″x6″ tray is lightweight yet sturdy, with a smooth bamboo surround that adds a touch of elegance.
The hydroponic insert and hemp mats are soft but durable, and the black felt lid slides on easily, sealing in moisture.
As I set it up, I immediately appreciated how straightforward it was to start. No soil, no mess—just add water to the reservoir.
The included grow guide is clear, making it perfect even for beginners. Watching the microgreens sprout in just a few days is oddly satisfying, with vibrant green shoots pushing through the hydroponic setup.
What surprised me most was how versatile the kit is. I tried both hydroponic and soil-growing methods, thanks to the removable insert.
The seed varieties, especially the Red Garnet Amaranth and Superfood Mix, sprouted quickly and packed a punch of flavor and color.
Harvesting was fuss-free, and the microgreens tasted fresh and crisp—way better than store-bought. Plus, the compact size means I can keep this on my kitchen counter without cluttering space.
The self-watering feature really takes the guesswork out of regular watering, making it almost maintenance-free.
Overall, this kit delivers on its promise of simple, nutritious gardening. Whether you want to boost your salads or just enjoy a bit of green therapy, it’s a fun, easy way to get started.
The only hiccup might be the limited size for larger harvests, but for daily greens, it’s perfect.
Back to the Roots Microgreen Grow Kit 6-Variety Pack

- ✓ Easy to grow indoors
- ✓ Organic, non-GMO seeds
- ✓ Fast, flavorful harvest
- ✕ Soil can dry out quickly
- ✕ Limited space for larger crops
| Seed Varieties | Broccoli, Kale, Purple Kohlrabi, Red Cabbage, plus 2 additional unspecified varieties |
| Seed Packaging | 6 multi-variety seed packets included |
| Organic Certification | USDA Certified Organic and Non-GMO |
| Growth Support | Includes access to Green-Thumb Text Support with detailed instructions |
| Planting Method | Indoor microgreen cultivation kit suitable for home use |
| Material & Origin | Made in the USA |
This Back to the Roots Microgreen Grow Kit has been sitting on my wishlist for a while, mainly because I’ve always wanted to see how easy and rewarding microgreens can be at home. When I finally got my hands on it, I was immediately impressed by the sturdy, attractive packaging and the variety of seed packs included.
The six different seed varieties, including broccoli, kale, purple kohlrabi, and red cabbage, each came in small, clearly labeled packets. I loved how compact the kit is, making it perfect for indoor gardening without taking up too much space.
The instructions were simple, and the organic seeds looked fresh and vibrant.
Growing was surprisingly straightforward. The soil and seed trays are well-designed, and I appreciated the detailed Green-Thumb support that guided me step-by-step.
Within just a few days, I saw tiny green shoots sprouting, and in about a week, I was harvesting flavorful microgreens packed with nutrients. The taste was fantastic—much more intense than store-bought versions—and I felt good knowing they were organic and non-GMO.
One of the best parts is how fast and satisfying it is to grow your own superfood. It’s a great way to boost your salads, sandwiches, or smoothies with fresh greens.
The only downside I noticed was that the soil needed a bit more moisture than I expected, but overall, it’s a simple and rewarding experience.
In short, this kit makes microgreen gardening accessible and fun, even for beginners. The quality and variety of seeds, plus the detailed support, make it a no-brainer for anyone wanting to add more nutrients to their diet while enjoying the process.
MetryGrow 48W Full Spectrum LED Grow Light Seed Starter Kit

- ✓ Complete all-in-one kit
- ✓ Strong, uniform lighting
- ✓ Durable, leakproof trays
- ✕ Slightly pricey
- ✕ Bulky setup
| Seed Tray Capacity | 80 cells (two 40-cell trays) |
| Grow Light Power | 48W full spectrum LED |
| Heating Mat Power | 30W with 6 temperature levels |
| Lighting Coverage | Uniform coverage across entire tray with 8 dimming levels |
| Tray Material | Reinforced 1.2mm thick plastic, leakproof ridge design |
| Adjustable Stand Height | Supports up to 16 inches for consistent lighting |
Compared to other microgreen starter kits I’ve seen, the MetryGrow 48W Full Spectrum LED Grow Light Seed Starter Kit immediately stands out with its robust 80-cell system. It feels more substantial than the typical 60 or 72-cell trays, giving you plenty of room to grow a variety of microgreens, herbs, or vegetables.
The clear humidity dome and water reservoir bases add a professional touch. You really get a full setup that’s ready to go right out of the box, which is perfect if you’re new to indoor gardening.
I noticed the heavy-duty 1.2mm seed trays are a huge plus—they don’t bend or warp, even when filled with moist soil.
The grow light itself feels solid, with a sleek design and easy-to-use remote control. The 8 dimming levels and dual spectrum modes helped me support seedlings at various stages without any fuss.
The light’s coverage was uniform across the whole tray, so no seedlings were left in the shadows.
The 30W heating mat was a game-changer for germination. It kept the soil at a stable temperature, speeding up sprouting.
With six adjustable heat levels and an auto-timer, I could customize the environment for different seeds like peppers or herbs.
Removing the humidity dome and adjusting the independent 16″ light stand was simple, and it kept the light consistent as my seedlings grew taller. Plus, the leakproof ridge design kept water from dripping onto my table, which is a thoughtful touch.
Overall, this kit feels like a complete package that takes the guesswork out of seed starting. It’s versatile enough for indoor and outdoor use, and the included accessories make it easy to start growing immediately, season after season.
mizuna Microgreens Growing Kit – 2 Stackable White Ceramic

- ✓ Elegant ceramic design
- ✓ Easy passive hydroponics
- ✓ Continuous harvest capability
- ✕ Fragile ceramic trays
- ✕ Slightly pricier than plastic options
| Number of Trays | 2 stackable ceramic trays |
| Tray Material | High-quality ceramic, no plastic components |
| Tray Dimensions | Not explicitly specified, but designed for indoor microgreen cultivation |
| Growing Medium | Included (specific type not detailed, likely soil or inert medium) |
| Hydroponic System | Passive hydroponic setup |
| Maximum Growing Cycles | Continuous growth system enabling multiple harvests |
You’re standing in your kitchen, trying to squeeze a handful of fresh microgreens onto your salad, and suddenly, it hits you—why buy microgreens when you can grow your own? You grab the mizuna Microgreens Growing Kit, noticing its sleek white ceramic trays stacked neatly on your countertop.
The weight of the ceramic feels premium, sturdy enough to sit confidently without tipping over.
As you start the process, the trays stack effortlessly, saving precious space. The included seeds and growing medium look high-quality, promising vigorous growth.
You appreciate the passive hydroponic design; it simplifies sprouting without needing complex equipment or constant watering. You place the top tray with sprouted seeds, then slide the second underneath for ongoing harvests.
Within days, your microgreens shoot up vigorously, thanks to the well-designed system. The ceramic dishes are easy to clean—just pop them in the dishwasher—and look elegant enough to leave out.
The passive hydroponic setup means you don’t need to fuss over watering, making it ideal for busy mornings or those new to gardening.
What really stands out is the continuous growth feature. You can keep adding new seeds to the top tray, ensuring a steady supply of fresh greens.
Plus, the natural ceramic material aligns perfectly with your eco-conscious approach, avoiding plastic altogether. The only thing to keep in mind: the ceramic trays are delicate if knocked over, so a steady hand is best.
All in all, this kit transforms microgreen growing from a hassle into a satisfying, stylish routine that fits seamlessly into your indoor space. It’s a smart buy for anyone craving fresh greens without the fuss.
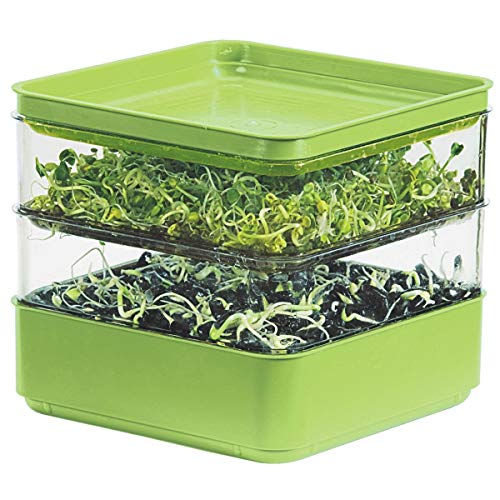
GARDENS ALIVE! Seed Sprouter Kit, Two Tier Stackable
- ✓ Easy to use
- ✓ Fast germination
- ✓ Compact and stackable
- ✕ Limited tray size
- ✕ No grow lights included
| Tray Material | BPA-free food grade plastic |
| Tray Dimensions | 5.5 x 5.5 x 1.5 inches each |
| Number of Tiers | Two tiers, expandable to support up to 6 trays |
| Tray Height | 1.5 inches per tray |
| Overall Dimensions | 5.5 x 5.5 x 5.25 inches |
| Growth Method | Hydroponic, no soil or sunlight required |
Walking into my kitchen one morning, I notice the GARDENS ALIVE! Seed Sprouter Kit sitting on the counter, ready for action.
I decide today’s the day to grow my own microgreens for a quick, fresh addition to lunch.
The two-tier design immediately catches my eye. The clear plastic trays let me watch the tiny seeds sprout and grow—it’s oddly satisfying.
I appreciate how compact it is, fitting easily on my countertop without taking up too much space.
What’s great is that no soil or sunlight is needed. I just add water, cover it, and wait.
The hydroponic setup speeds up germination—my sprouts started popping up in just a few days, much faster than I expected. Watching them grow so quickly makes me feel like a real gardener, even in my tiny apartment.
The vented lid helps maintain humidity, and the bottom tray catches excess water, so no mess. It’s easy to stack another tray on top if I want to grow multiple kinds at once.
I’ve been sprouting radish, broccoli, and mung beans, and each crop is fresh and crunchy.
Cleaning is simple too—just rinse the trays and dry them. Plus, I love that it’s eco-friendly and BPA-free.
Growing my own sprouts means I can add a healthy, spicy kick to salads, sandwiches, or soups any day.
Overall, this kit makes indoor gardening straightforward and fun. It’s perfect for busy bees who want fresh greens without hassle or mess.
I’ve already ordered another set to try growing different seeds—this little sprouter has become a kitchen staple.
What Are the Key Benefits of Growing Microgreens at Home?
The key benefits of growing microgreens at home include convenience, health benefits, and culinary versatility.
- Convenience: Growing microgreens at home is remarkably easy and requires minimal space, making it ideal for urban dwellers and those with limited gardening experience. Most microgreens can be grown indoors on a sunny windowsill or in a small container, allowing for year-round cultivation regardless of weather conditions.
- Health Benefits: Microgreens are packed with nutrients, often containing higher concentrations of vitamins, minerals, and antioxidants compared to their mature counterparts. Incorporating these nutrient-dense greens into your diet can enhance overall health and well-being, supporting immune function and reducing the risk of chronic diseases.
- Culinary Versatility: Microgreens offer a burst of flavor and texture that can elevate a variety of dishes, from salads and sandwiches to soups and garnishes. With many different varieties available, such as basil, radish, and sunflower, home growers can customize their microgreen selection to suit their personal taste and enhance their culinary creations.
- Cost-Effectiveness: Growing your own microgreens can be significantly more cost-effective than purchasing them from the store. A starter kit allows you to produce multiple harvests from a single investment, providing fresh greens at a fraction of the price found in supermarkets.
- Environmental Impact: Cultivating microgreens at home reduces reliance on store-bought produce, which often involves packaging and transportation that contribute to environmental pollution. By growing your own, you can minimize your carbon footprint and enjoy fresh food with less environmental impact.
What Should You Consider When Choosing the Best Microgreen Starter Kit?
When choosing the best microgreen starter kit, several factors should be considered to ensure successful growth and satisfaction.
- Seed Variety: The types of seeds included in the kit are crucial as different microgreens have varying flavors, growth rates, and nutritional benefits. Look for kits that offer a diverse selection to experiment with various tastes and uses in your meals.
- Growing Medium: The quality of the growing medium, whether it’s soil, coconut coir, or a hydroponic setup, impacts the germination and growth of your microgreens. A good medium retains moisture and provides the necessary nutrients for optimal growth.
- Light Requirements: Consider the light needs of the microgreens you are growing; some may require direct sunlight while others thrive in low-light conditions. Ensure the kit provides guidance on lighting options or includes a grow light if necessary.
- Size and Space Requirements: The size of the kit should match your available space, whether it’s a countertop or a larger garden setup. Compact kits are ideal for small spaces, while larger ones may allow for more extensive growth.
- Ease of Use: Look for kits that come with clear instructions and are beginner-friendly, especially if you’re new to gardening. Features like pre-measured seeds, easy-to-follow guides, and included tools can make the process more approachable.
- Harvesting and Maintenance: Choose a kit that includes details on when and how to harvest your microgreens, as well as maintenance tips to keep them healthy. Kits that simplify the maintenance process can enhance your overall experience.
- Price and Value: Compare the price of different kits, ensuring you receive good value for the seeds, tools, and information provided. Investing in a quality kit can lead to better results and a more enjoyable growing experience.
What Types of Seed Varieties Are Ideal for Beginners?
For beginners interested in microgreens, certain seed varieties are particularly easy to grow and yield quick results.
- Radish: Radish microgreens are one of the fastest-growing varieties, typically sprouting within 5-7 days. They have a peppery flavor and are rich in vitamins, making them a popular choice for salads and sandwiches.
- Basil: Basil microgreens take about 10-14 days to grow and offer a sweet, aromatic flavor that enhances many dishes. They are not only delicious but also easy to cultivate in small spaces, making them ideal for beginners.
- Pea Shoots: Pea shoots are known for their sweet taste and tender texture, germinating in about 7-14 days. They are highly nutritious and can be enjoyed raw in salads or as a garnish, providing a fresh taste that appeals to many.
- Sunflower: Sunflower microgreens take around 7-10 days to grow and have a nutty flavor that pairs well with various cuisines. They are also packed with nutrients, including protein and healthy fats, making them a nutritious addition to meals.
- Broccoli: Broccoli microgreens are easy to grow, typically sprouting in 5-10 days, and are packed with antioxidants and vitamins. Their mild flavor makes them versatile for use in salads, smoothies, or as a garnish.
How Important is the Growing Medium in Microgreen Starter Kits?
The growing medium is a critical factor in the success of microgreen starter kits as it influences plant growth, nutrient absorption, and ease of maintenance.
- Soil: Soil is a traditional growing medium rich in nutrients, which can support healthy root development and provide essential minerals. However, it may require more careful watering to prevent over-saturation and can introduce pests if not managed properly.
- Coconut Coir: Coconut coir is an eco-friendly and sustainable alternative to soil that retains moisture well while offering good aeration for roots. This medium is pH-neutral and helps reduce the risk of diseases, making it an excellent choice for beginners.
- Hydroponic Mats: Hydroponic mats, such as felt or jute, are designed to hold moisture without soil, allowing for a clean and easy growing experience. They promote faster germination and growth by providing a sterile environment that reduces the risk of contamination.
- Rockwool: Rockwool is a popular hydroponic medium made from spun volcanic rock, offering excellent moisture retention and aeration. It is inert and sterile, ideal for microgreens, but requires careful handling to avoid waterlogging.
- Seedling Plugs: Seedling plugs are pre-formed growing mediums that provide a convenient option for starting microgreens. They are designed to support young plants by providing adequate moisture and nutrients while allowing for easy transplanting.
How Do Popular Microgreen Starter Kits Compare in Features and Price?
| Feature | Kit A | Kit B | Kit C |
|---|---|---|---|
| Price | $30 – Budget-friendly kit for beginners | $45 – Mid-range option with extra supplies | $60 – Premium kit with advanced features |
| Included Supplies | Seeds, soil, trays | Seeds, soil, trays, and a growing guide | Seeds, soil, trays, guide, and LED light |
| Growing Time | 7-14 days – Quick to harvest | 10-14 days – Standard growing time | 8-12 days – Optimized for faster growth |
| Brand | Brand X | Brand Y | Brand Z |
| Customer Rating | 4.5/5 – Highly rated by users | 4.0/5 – Good reviews, some minor complaints | 4.8/5 – Excellent feedback for features |
| Warranty | 1 year warranty | 6 months warranty | 2 years warranty |
| Tray Size | 10×20 inches | 10×20 inches | 12×24 inches |
What Are the Best Practices for Growing Microgreens Successfully?
To successfully grow microgreens, several best practices should be followed:
- Choosing the Right Seeds: Selecting high-quality seeds specifically meant for microgreens ensures better germination rates and healthier plants. Look for organic seeds or those labeled as non-GMO to avoid chemicals that could affect growth.
- Using Proper Growing Medium: A suitable growing medium, such as coconut coir, peat moss, or a soil-less mix, provides the necessary support and nutrients for microgreens. The medium should retain moisture while allowing for good drainage to prevent root rot.
- Providing Adequate Light: Microgreens require plenty of light to grow strong and vibrant. Grow lights or a sunny windowsill can provide the necessary illumination; ideally, they should receive 12-16 hours of light daily to promote healthy growth.
- Maintaining Optimal Temperature and Humidity: Keeping the growing environment at a temperature between 60°F to 75°F and maintaining humidity levels around 50-70% can significantly enhance growth rates. Covering the seeds with a humidity dome until they sprout can help maintain moisture levels.
- Watering Techniques: Watering should be done gently to avoid displacing seeds or damaging delicate sprouts. Using a spray bottle or bottom watering method can help maintain moisture without flooding the microgreens.
- Implementing Proper Air Circulation: Good air circulation prevents mold growth and promotes healthy seedlings. Ensure that the growing area is well-ventilated and consider using a small fan if necessary to improve airflow.
- Harvesting at the Right Time: Microgreens should be harvested when they reach about 1-3 inches in height and have developed their first true leaves, known as cotyledons. Harvesting at the right time ensures the best flavor and nutritional value.
- Storing Properly: After harvesting, storing microgreens in the refrigerator in a breathable container can extend their shelf life. Avoid washing them until you are ready to use them, as excess moisture can lead to spoilage.
How Can You Maximize Yield from Your Microgreen Starter Kit?
To maximize yield from your microgreen starter kit, consider the following strategies:
- Optimal Light Conditions: Providing sufficient light is crucial for healthy microgreen growth. Use grow lights or place your kit in a bright, sunny location to ensure your microgreens receive at least 12-16 hours of light daily, which promotes robust growth and vibrant colors.
- Quality Soil or Growing Medium: The choice of soil or growing medium significantly affects the yield. Opt for a high-quality seed-starting mix or a specialized microgreen soil that retains moisture yet provides good drainage, allowing roots to develop without becoming waterlogged.
- Correct Watering Technique: Overwatering or underwatering can hinder microgreen development. Water gently using a spray bottle to keep the soil consistently moist but not soggy, ensuring that the seeds have the right environment for germination and growth.
- Seed Quality and Variety: Start with high-quality seeds from reputable suppliers to ensure good germination rates. Experiment with different microgreen varieties, as some may yield more than others, allowing you to discover which types perform best in your specific conditions.
- Temperature and Humidity Control: Maintaining the right temperature and humidity levels is essential for optimal growth. Most microgreens thrive in temperatures between 65°F to 75°F; consider using a humidity dome during germination to retain moisture and ensure uniform growth.
- Pest Management: Monitor your microgreens for pests or diseases that can reduce yield. Use organic methods for pest control, such as neem oil or insecticidal soap, to maintain a healthy growing environment without harming the plants.
- Regular Harvesting: Harvesting at the right time is crucial for maximizing yield. Cut microgreens when they are about 1-2 inches tall and before they develop true leaves, as this is when they are most flavorful and nutrient-dense.
- Rotation and Successive Planting: To ensure a continuous supply, practice crop rotation and successive planting. This involves staggering the planting of different microgreens every few days, which allows for regular harvests and maximizes the use of your starter kit.
What Common Mistakes Should You Avoid When Starting with Microgreens?
When starting with microgreens, certain common mistakes can hinder your success and growth.
- Choosing the Wrong Seeds: Selecting seeds that are not suited for microgreens can lead to poor germination and suboptimal growth. It’s essential to choose high-quality seeds specifically labeled for microgreens to ensure they are free from contaminants and have a high germination rate.
- Neglecting Light Requirements: Microgreens require adequate light for healthy growth, and many beginners underestimate this need. Insufficient light can result in leggy, weak plants; using grow lights can help provide the necessary brightness if natural light is lacking.
- Improper Watering Techniques: Overwatering or underwatering can significantly affect microgreen health. It’s important to keep the soil consistently moist but not soggy, as excessive water can lead to mold growth while too little can hinder germination.
- Ignoring Air Circulation: Good air circulation is crucial for preventing mold and ensuring healthy plant growth. Beginners often overlook this aspect, so placing microgreens in a well-ventilated area or using fans can help maintain airflow.
- Using Inappropriate Growing Medium: Not all growing mediums are suitable for microgreens; some can retain too much moisture or lack essential nutrients. Opting for a sterile, lightweight medium like coconut coir or seed-starting mix can promote healthier growth and reduce disease risk.
- Failing to Harvest at the Right Time: Harvesting microgreens too early or too late can affect their taste and nutritional value. It’s best to harvest them when the first true leaves have emerged, typically 7-14 days after germination, to ensure the best flavor and quality.
- Overcrowding the Seeds: Planting seeds too densely can lead to competition for nutrients and light, resulting in weak and spindly plants. Following the recommended seed density for each type of microgreen will help ensure each plant has enough room to grow strong and healthy.