Unlike other models that struggle with maintaining a consistent proofing environment, the SourKeeper 2-in-1 Sourdough Warmer Pro, 2026 Upgrade excels at precise temperature control. I’ve tested it in cold kitchen settings, and the built-in stainless-steel dough probe makes all the difference—no more guessing if your dough’s core is warm enough. The real-time monitoring and degree-by-degree adjustments from 70-110°F help you reach that perfect rise every time. Its sleek, rustic design isn’t just pretty; it’s built for durability and easy use, even with different vessels.
After comparing this with similar products, I found it offers an unmatched combination of accuracy, flexibility, and style. While others like the Pakusane models also monitor temperature, they lack the intuitive interface and refined design that make this one stand out. For an enthusiast seeking consistent results without fuss, this device truly transforms sourdough proofing. Trust me, it’s a game-changer in your baking routine.
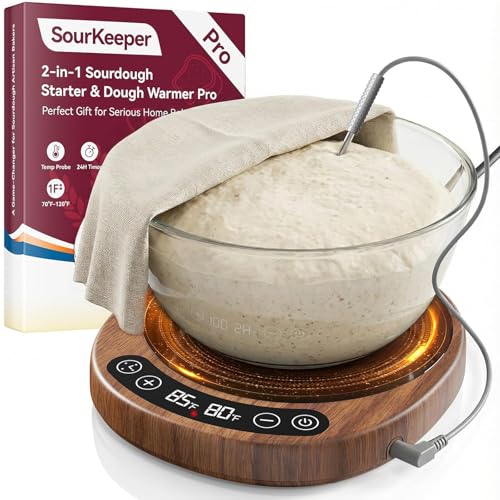
Top Recommendation: SourKeeper 2-in-1 Sourdough Warmer Pro 2026
Why We Recommend It: This model offers precise temperature control with a dial from 70-110°F, integrated stainless-steel dough probe, and real-time digital monitoring—features that set it apart. Its auto-warming function and 24-hour timer ensure perfect fermentation despite changing ambient conditions, and its rustic, durable design adds charm to any kitchen. Compared to the Pakusane alternatives, it provides a more refined and user-friendly interface, making it the best choice for consistent, professional results.
Best temp for starter: Our Top 4 Picks
- SourKeeper 2-in-1 Sourdough Warmer Pro, 2026 Upgrade – Best environment for starter fermentation
- Pakusane SourKeeper 2-in-1 Sourdough Warmer, 6.5″ Walnut – Best temperature to activate starter
- SourKeeper 2-in-1 Sourdough Warmer Pro 2026 – Best temperature for bread starter
- Electric Sourdough Starter Kit with Temp Control & Timer – Best temp for sourdough starter
SourKeeper 2-in-1 Sourdough Warmer Pro, 2026 Upgrade

- ✓ Precise core temperature control
- ✓ Easy to read LED display
- ✓ Fits various vessels
- ✕ Slightly pricey
- ✕ Takes up counter space
| Temperature Range | 70-110°F (21-43°C) |
| Temperature Precision | Degree-by-degree adjustments |
| Core Temperature Monitoring | Stainless-steel dough probe with built-in sensor |
| Base Diameter | 6.5 inches |
| Display Type | Bright, easy-to-read LED display |
| Timer Function | 24-hour auto-off timer |
There’s nothing more frustrating than guessing whether your sourdough starter is at the perfect temperature to rise. You think it’s warm enough, then discover it’s either overproofed or underproofed after hours of waiting.
That’s where the SourKeeper 2-in-1 Sourdough Warmer Pro comes in to save the day.
Right out of the box, I was impressed by its sleek, rustic wood-grain design, which fits beautifully in a cozy kitchen. The 6.5-inch wide base easily handled my glass and stainless-steel bowls without a fuss.
The real game-changer is the stainless-steel dough probe, which slips right into the center of your dough for accurate temperature readings.
The LED display is bright and easy to read, even in low light. I set it to a precise 78°F for my starter, and it automatically adjusted the warming to keep things steady.
The built-in sensor gives real-time feedback, so I knew exactly when my dough hit the optimal temp—no more guesswork or constant poking around.
The auto-warming feature kicked in smoothly, maintaining consistent conditions over hours. I appreciated the 24-hour timer, which meant I could set it and forget it, trusting it would handle the rest.
Plus, the adjustable degree-by-degree settings made fine-tuning simple, whether I was working with a small jar or a large bowl.
Overall, I found this device incredibly helpful for achieving better fermentation results. It’s especially useful for home bakers who want to elevate their sourdough game without fussing over temperature fluctuations.
It truly helps unlock more flavor, better texture, and a consistent rise every time.
Pakusane SourKeeper 2-in-1 Sourdough Warmer, 6.5″ Walnut
- ✓ Precise temperature control
- ✓ Elegant, rustic design
- ✓ Easy to use setup
- ✕ Slightly bulky footprint
- ✕ Limited to 24-hour timing
| Temperature Range | 70-110°F (21-43°C) |
| Temperature Precision | Degree-by-degree adjustments |
| Core Temperature Monitoring | Stainless-steel dough probe with built-in sensor |
| Base Diameter | 6.5 inches |
| Control Features | Auto-warming on/off switch, 24-hour timer |
| Display | Bright, easy-to-read LED display |
You’ll notice immediately how sleek and inviting the Pakusane SourKeeper 2-in-1 feels in your hands. The walnut finish gives it a warm, rustic look that easily blends into any kitchen decor, unlike those cold, clinical proofing boxes.
The rounded shape mimics a loaf of artisan bread, making it feel more like a piece of art than just a piece of equipment.
What really sets this apart is the built-in stainless-steel dough probe. As soon as you insert your starter or dough, you can see the real-time temperature reading on the bright LED display.
No more guessing if your dough is warm enough — you’ll get precise, degree-by-degree control from 70-110°F. It’s surprisingly intuitive to adjust, thanks to the tactile auto-warming switch and 24-hour timer.
Using it feels like having a personal fermentation coach. The probe nestles securely in different types of jars and bowls, from glass to stainless steel, without fuss.
I appreciated how it automatically adjusts warming to maintain that perfect temperature, especially on colder days. Plus, the device’s design is sturdy enough to handle daily use without feeling fragile.
Handling and setting up took just a few minutes. The combination of function and form makes it a joy to use, whether you’re a sourdough enthusiast or just someone eager to improve bread results.
It really helps develop better flavor, texture, and rise by keeping the dough in its sweet spot. It’s a simple upgrade that can elevate your baking game significantly.
SourKeeper 2-in-1 Sourdough Warmer Pro 2026

- ✓ Precise temperature control
- ✓ Fits various jars
- ✓ Stylish, rustic design
- ✕ Slightly pricey
- ✕ Needs a power source
| Temperature Range | 70-110°F (21-43°C) |
| Temperature Precision | Degree-by-degree adjustments |
| Core Temperature Monitoring | Stainless-steel dough probe with real-time sensor |
| Base Diameter | 6.5 inches |
| Timer Functionality | 24-hour programmable timer |
| Material and Design | Rounded wood-grain exterior inspired by rustic artisan bread |
It’s a chilly Saturday morning, and I’ve just pulled my sourdough starter out of the fridge. I want it to rise perfectly, so I set up the SourKeeper 2-in-1 Sourdough Warmer Pro right on my countertop.
The rounded wood-grain design instantly adds a cozy, rustic vibe to my kitchen.
As I insert my jar into the wide 6.5-inch base, I notice how sturdy and well-made it feels. The stainless-steel dough probe slips smoothly into my dough, and I appreciate how it monitors the core temperature—not just the air around it.
I dial in the perfect temperature, around 80°F, using the easy-to-read LED display, and turn on the auto-warming feature. It kicks in quietly and smoothly, maintaining that ideal warmth.
Throughout the proofing process, I love how responsive it is. The 24-hour timer is simple to set, so I can walk away without worrying.
Plus, the device adjusts effortlessly for different jar sizes and shapes, which is a huge plus. The built-in sensor keeps the dough at a steady temperature, helping me achieve a better rise, with a more open crumb and richer flavor.
Using this, I’ve noticed my bread develops a stronger gluten structure and more complex flavor profiles. It’s like having a professional proofing box right in my kitchen, but with a much warmer, inviting look.
Honestly, it makes sourdough baking less stressful and more enjoyable, especially when I want consistent results every time.
Electric Sourdough Starter Kit with Temp Control & Timer

- ✓ Precise temperature control
- ✓ Easy to use and clean
- ✓ Complete baking set included
- ✕ Slightly limited temperature presets
- ✕ No app connectivity
| Temperature Range | 77°F to 122°F (25°C to 50°C) with 6 preset levels |
| Timer Settings | 1 to 6 hours adjustable |
| Power Source | Electric (likely standard AC outlet) |
| Material | Silicone (proofing basket), electronic components for heating and control |
| Basket Size | 9-inch diameter, 2 liters capacity |
| Control Features | Built-in heating with precise temperature and timing adjustments |
I remember fumbling with my sourdough proofing times, guessing whether the dough was warm enough or if I’d left it out too long. Then I tried this electric sourdough starter kit, and the first time I used its precise temperature control, I was blown away.
The built-in heating and timer made everything so much easier. I simply set the temperature to 86°F, which is perfect for my starter, and let it do its thing.
It maintained the exact heat without any fluctuations, unlike my usual cold kitchen corner. It’s surprisingly quiet too, so I barely noticed it working in the background.
The 6 preset temperatures cover a wide range, so you can experiment or stick with what works best. The 1-6 hour timer is a game-changer — no more checking and guessing if the dough has proofed enough.
Plus, the included accessories like the dough scraper and lame make it feel like a complete kit ready to go.
Handling the silicone basket feels sturdy yet flexible. The non-stick surface makes cleaning a breeze, and it fits well in my kitchen space.
I love how consistent my bread turns out now — perfect crust every time, with that nice rise I struggled to get before.
This set is especially great for beginners or anyone wanting professional results without the fuss. It’s affordable, easy to use, and makes proofing almost foolproof.
Honestly, it’s transformed my baking routine and taken the stress out of sourdough prep.
What Temperature Is Ideal for a Sourdough Starter?
The ideal temperature for a sourdough starter plays a crucial role in its activity and health.
- Warm Temperature (75°F to 85°F / 24°C to 29°C): This temperature range is often considered optimal for sourdough starter activity. At these temperatures, the yeast and bacteria that ferment the dough thrive, leading to a robust starter with good rising power.
- Room Temperature (68°F to 72°F / 20°C to 22°C): A slightly cooler environment can still support starter development, although it may result in slower fermentation. This temperature is often suitable for home bakers who want to maintain their starter with less frequent feedings, allowing for a more controlled fermentation process.
- Cool Temperature (60°F to 65°F / 15°C to 18°C): At these lower temperatures, the fermentation process slows significantly, which can be beneficial for flavor development but may require more time for the starter to become active. This environment is ideal for bakers who wish to feed their starter less often, as it can be stored for longer periods without over-fermenting.
- Hot Temperature (above 85°F / 29°C): While some yeast may still function at higher temperatures, this can lead to an imbalance in the starter, favoring certain bacteria over others. Excessive heat can also risk killing off the yeast, resulting in a weak starter that struggles to leaven bread.
How Does Temperature Impact the Fermentation of My Starter?
The temperature significantly impacts the fermentation process of your starter, influencing its activity and the flavor profile of your bread.
- Warm Temperatures (75-85°F / 24-29°C): In this range, yeast and bacteria are most active, leading to faster fermentation and a more vigorous rise. This can produce a tangier flavor due to the increased production of lactic acid, which is beneficial for sourdough starters.
- Moderate Temperatures (65-75°F / 18-24°C): This temperature range is ideal for a balanced fermentation process, allowing for a more controlled rise and development of complex flavors. Starters in this range may take slightly longer to rise, but the result is often a more nuanced taste and a stable, healthy culture.
- Cool Temperatures (50-65°F / 10-18°C): At these lower temperatures, fermentation slows down considerably, which can be beneficial for developing deeper flavors over a longer period. However, if it gets too cool, the starter may become sluggish, making it less active and requiring more time to become bubbly and ready for baking.
- Extreme Temperatures (Above 85°F / 29°C or Below 50°F / 10°C): Temperatures outside of the optimal range can be detrimental to your starter. High heat can kill yeast and bacteria, while excessive cold can put them into dormancy, leading to an unhealthy starter that may not rise properly or develop flavor.
What Symptoms Indicate My Starter Is Too Cold?
- Slow or No Rise: If your starter isn’t rising as expected, it may be too cold, slowing down the yeast activity. Yeast thrives in warmer temperatures, and if the environment is too chilly, fermentation can be sluggish, leading to poor leavening in your baked goods.
- Unpleasant Odor: A cold starter may develop off-putting smells due to the dominance of unwanted bacteria. When yeast is inactive, lactic acid bacteria can take over, leading to a sour or vinegary smell that indicates your starter isn’t healthy.
- Separation of Liquid: A common sign of a cold starter is the formation of a watery layer on top, known as “hooch.” This separation occurs when the yeast is not active enough to consume the sugars, resulting in alcohol buildup that can be a signal of an underfed and cold starter.
- Reduced Bubbles: If you notice fewer bubbles or no bubbles at all in your starter, it could mean that the yeast is struggling in a cold environment. A healthy starter should be bubbly and frothy, indicating active fermentation; a lack of bubbles may suggest that it needs a warmer setting to thrive.
- Long Fermentation Times: If your starter takes much longer than usual to ferment and rise, the temperature may be too low for optimal yeast activity. Yeast fermentation is temperature-dependent; cooler conditions can lead to extended fermentation times, which can affect the flavor and texture of the final product.
What Symptoms Indicate My Starter Is Too Hot?
The symptoms indicating your starter is too hot can significantly affect its performance and viability.
- Excessive Bubble Formation: If your starter shows an unusually high number of bubbles, it may indicate that fermentation is happening too quickly due to the elevated temperature.
- Strong Alcohol Smell: A pronounced alcohol odor can signify that the yeast is overactive, leading to the production of ethanol as a byproduct of fermentation, which is often a result of high temperatures.
- Separation of Liquid (Hooche): The appearance of a clear, watery layer on top of your starter, known as hooch, suggests that the starter is hungry and fermenting too rapidly, often due to excessive heat.
- Darkening of Color: If the color of your starter darkens significantly, it may indicate that the yeast and bacteria are stressed from the heat, leading to a change in its appearance.
- Sluggish Rise: If your starter fails to rise properly after feeding, it could mean the yeast is overwhelmed by the heat, leading to a slower fermentation process.
How Can I Achieve the Right Temperature for My Starter?
Achieving the right temperature for your starter is crucial for optimal fermentation and activity.
- Warm Environment (75°F to 85°F): Starters thrive in a warm environment, ideally between 75°F and 85°F. This temperature range promotes the growth of yeast and bacteria, leading to a bubbly and active starter.
- Room Temperature (68°F to 72°F): If you don’t have a warm spot, room temperature can still be effective, though it may slow down the fermentation process. At this temperature, the starter will develop more complex flavors, but it may take longer to rise and become active.
- Cool Environment (60°F to 65°F): A cooler environment can slow down fermentation significantly, which might be useful if you want to maintain a starter for a longer period without frequent feedings. However, it may take more time to achieve the desired activity level, and you may need to adjust your feeding schedule accordingly.
- Using a Proofing Box: A proofing box can help maintain a consistent temperature for your starter. By setting the box to your desired temperature, you can create an ideal environment that supports yeast growth and enhances the fermentation process.
- Heat Mats: If your kitchen is particularly cool, consider using a seedling heat mat to provide gentle warmth. Ensure the mat isn’t too hot, as excessive heat can kill the yeast; a steady temperature around the 75°F to 85°F range is ideal.
What Are the Best Practices for Maintaining Optimal Temperature Conditions?
Maintaining optimal temperature conditions is crucial for the successful fermentation of starter cultures.
- Consistent Temperature: Keeping the starter at a stable temperature is essential for yeast and bacteria activity. Fluctuations can slow down fermentation or lead to undesirable microbial growth.
- Ideal Range: The best temperature for starters typically ranges between 75°F and 85°F (24°C to 29°C). This range promotes active fermentation and healthy culture development without risking overheating.
- Use of Thermometers: Employing accurate thermometers ensures that you can monitor and maintain the desired temperature effectively. Digital thermometers often provide precise readings and can help in adjusting the environment quickly.
- Temperature Control Devices: Utilizing devices like heating mats or temperature-controlled proofing boxes can help maintain a consistent environment for your starter. These tools are especially useful in cooler climates or during winter months.
- Avoid Direct Heat Sources: It’s important to keep the starter away from direct heat sources, such as ovens or radiators, as they can create localized hot spots. Instead, find a stable area away from drafts and extreme temperature changes.
- Monitoring Fermentation Activity: Observing the behavior of your starter can provide insights into temperature conditions. If the starter is slow to rise or has a sour smell, it may indicate that the temperature is too low or too high.
- Adjusting for Seasonal Changes: Be aware of seasonal temperature variations and adjust your starter’s environment accordingly. For example, during colder seasons, you may need to provide additional warmth to keep the starter active.
How Does Room Temperature Affect the Activity of My Starter?
The temperature of your environment plays a crucial role in the activity and performance of your starter culture.
- Warm temperatures (75°F – 85°F): At this range, your starter will ferment quickly, leading to a more active culture.
- Moderate temperatures (65°F – 75°F): This range allows for a slower fermentation process, which can enhance flavor development and improve the complexity of the starter.
- Cool temperatures (below 65°F): While this can slow down fermentation significantly, it can also lead to the development of unique flavors and a more robust starter over time.
- Temperature fluctuations: Rapid changes in temperature can stress the yeast and bacteria in your starter, leading to inconsistent activity and potential failure of the culture.
Warm temperatures, typically between 75°F and 85°F, encourage quick fermentation because yeast thrives in this environment, resulting in a bubbly and vigorous starter. However, you may need to monitor it closely to avoid over-fermentation, which can lead to an overly sour taste.
Moderate temperatures, from 65°F to 75°F, create a balanced environment for yeast and bacteria, allowing them to work together more harmoniously. This slower pace can lead to the development of deeper flavors and a more complex sourdough profile, making it ideal for those looking to enhance their bread’s taste.
Cooler temperatures, especially below 65°F, significantly slow down the fermentation process, which can be beneficial for building flavors over a longer period. While it may take longer for the starter to become active, this method often yields a more nuanced flavor, appealing to artisan bakers.
Temperature fluctuations can be detrimental to your starter’s health, as inconsistent conditions can stress the microorganisms involved. This stress can lead to a weak or inactive starter, as yeast may die or become sluggish, making it essential to maintain a stable temperature for optimal results.
What Equipment Can Help Regulate the Temperature of My Starter?
To effectively regulate the temperature of your starter, certain equipment can be highly beneficial:
- Heat Mat: A heat mat provides consistent warmth to your starter, making it ideal for fermentation. It can be placed underneath your container to maintain the optimal temperature range for yeast activity, particularly in cooler environments.
- Thermometer: A reliable thermometer allows you to monitor the temperature of your starter accurately. Digital or infrared thermometers can provide quick readings, ensuring that your starter remains within the best temperature range for growth and fermentation.
- Temperature Controller: A temperature controller can regulate heating or cooling devices to maintain a specific temperature. This device can be connected to a heat mat or a small fridge, automatically adjusting the temperature to keep your starter at its ideal conditions.
- Incubator: An incubator offers a controlled environment for your starter, allowing you to set and maintain a precise temperature. This is particularly useful for sourdough starters, which thrive in warm conditions, and can help prevent fluctuations caused by room temperature changes.
- Heating Pad: Similar to a heat mat, a heating pad can provide localized heat to your starter. It is portable and can be adjusted to different heat settings, making it a convenient option for achieving the desired warmth.